Slip Sheets Under Metal Roofs: Contractors’ Fix for Panel Binding
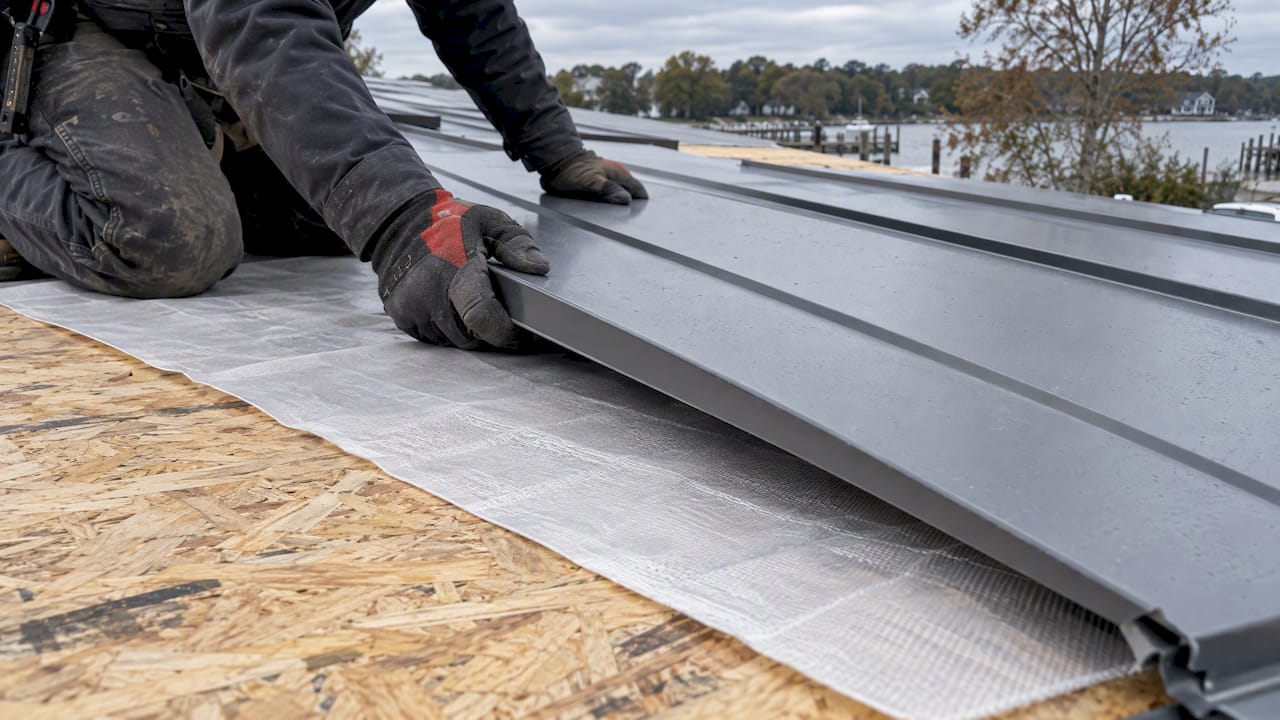
Learn how contractors install slip sheets under metal roofs, prevent panel binding, choose materials, and coordinate specs with Mid-Atlantic Metal Panels.
A slip sheet under metal is a thin separation layer, usually polymer or self-adhering ice-and-water shield, installed between the panel and the deck or underlayment to let the metal move without binding, tearing, or reacting with what’s beneath it. Skip rosin paper on standing seam jobs whenever possible. For most applications, a polymer slip sheet or ice-and-water shield gives better tear resistance and a cleaner barrier against treated lumber.
TL;DR:
- Use an ice and water membrane wherever treated lumber touches metal; polymer sheets handle general separation but do not block preservative related corrosion.
- Long panel runs and large roof planes need separation for thermal movement, while existing synthetic underlayment may already provide it; confirm equivalence in manufacturer documentation.
- Install sheets parallel to panel movement, lap seams in the direction water flows, and keep adhesive away from clips and expansion points.
- Rosin and kraft paper absorb moisture, weaken when wet, and wrinkle under panels; check polymer UV tolerance if the deck stays exposed.
Table of Contents
- What a Slip Sheet Is in Roofing (and Why It Isn’t a Packaging Term)
- Common Slip Sheet Materials and How They Perform
- When a Slip Sheet Is Required Versus Optional
- How to Install a Slip Sheet Under Metal Panels
- Where to Source Slip Sheet Material and What to Specify
- How Mid-Atlantic Metal Panels Supports Slip-Sheeted Installations
- Moisture and UV Exposure: What They Do to a Slip Sheet Over Time
- Do Slip Sheets Work the Same Across Panel Gauges and Profiles
- Checking a Slip Sheet After It’s Installed
- What Slip Sheets Actually Cost and Whether They’re Worth It
- Contractor Perspective: Common Mistakes and Quick Fixes
- Get Panels, Trim, and Coordination Built for Slip-Sheeted Roofs
- FAQ
- Sources
What a Slip Sheet Is in Roofing (and Why It Isn’t a Packaging Term)
In roofing, a slip sheet is a thin, flexible layer placed under a metal panel so the panel can expand and contract across its deck or underlayment without scraping, tearing, or sticking to it. The term shows up in a completely different industry too: logistics and warehousing use slip sheets as a pallet substitute, handled with push/pull forklift attachments or roller forks to cut storage and shipping costs. That’s a different product solving a different problem, and confusing the two when writing a spec can get a crew the wrong material delivered to the job site.
The roofing version matters because metal moves. A long standing seam run can shift several inches across its length as temperatures swing through a day, and that movement is enough to abrade underlayment or bind against fasteners if nothing separates the panel from what’s underneath it.
A few quick distinctions worth keeping straight on the job:
- Roofing slip sheets protect against friction and chemical reaction, not against pallet damage.
- Packaging slip sheets are rigid enough to replace a pallet deck; roofing slip sheets are thin and flexible by design.
- Always confirm with the spec or supplier which “slip sheet” a drawing calls for before ordering.
Common Slip Sheet Materials and How They Perform
Material choice depends on what the sheet needs to resist: moisture, tearing, UV, or chemical contact with treated wood. Here’s how the common options stack up on a metal roof.
- Rosin or kraft paper: the traditional choice, but it tears easily, holds moisture, and can create a slick, unsafe walking surface for installers.
- Polyethylene and polymer sheets: lightweight, resistant to tearing, and easy to roll out and cut on site.
- Ice-and-water shield and other self-adhering membranes: the standard choice wherever treated lumber touches metal decking.
- Synthetic underlayments: often used in place of a separate slip sheet on modern builds.
Synthetic underlayments often have much higher tear resistance than asphalt-saturated felt, which is why many steel roofing systems have moved away from rosin paper entirely. That tear resistance translates directly into fewer punctures during panel placement and fewer callbacks after installation.
The practical takeaway: reach for polymer sheets or synthetics for general separation duty, and reserve self-adhering membranes for spots where chemical compatibility, not just friction, is the concern.
When a Slip Sheet Is Required Versus Optional
Not every metal roof needs a dedicated slip sheet, but a few conditions make one necessary rather than optional.
- Long panel runs or large roof planes where thermal expansion and contraction create meaningful movement against the substrate.
- Any point where pressure-treated or preservative-treated lumber contacts the metal deck or framing, where the Steel Deck Institute recommends ice-and-water shield as a barrier to prevent corrosive reactions between the chemicals in the wood and the metal.
- Situations where you’re tempted to skip the layer entirely, which should always get checked against the panel manufacturer’s installation guide or NRCA recommendations first.
- Jobs already using a modern synthetic underlayment, which may already provide equivalent separation, so confirm with the manufacturer’s data sheet before adding a redundant layer.
That Steel Deck Institute guidance exists for a reason: treated wood’s preservative chemicals can accelerate corrosion on bare steel contact, and a membrane barrier is the standard fix. Skipping it to save a few minutes on install day is one of the more common ways a roof develops a hidden problem years later.
How to Install a Slip Sheet Under Metal Panels
Getting the placement right the first time saves a crew from pulling panels back up later. Here’s a practical sequence that works for most standing seam jobs.
- Confirm the layout first. Check the panel manufacturer’s spec sheet for required separation layers and review expected thermal movement for the panel length and gauge you’re installing.
- Roll out the sheet before setting panels. Lay slip sheet material across the deck or underlayment, running it parallel to the direction of panel movement rather than against it.
- Overlap seams correctly. Shingle-lap adjoining sheets by a few inches in the direction water will flow, and keep seams away from high-traffic walk paths where possible.
- Choose fastening method by material. Use mechanical fasteners sparingly on non-adhering polymer sheets so you don’t puncture more than necessary, and reserve self-adhering membrane for spots with direct treated-wood contact, keeping adhesive away from panel clip locations and expansion points.
- Watch your footing. Wet or loose slip sheet material underfoot is a real slip hazard, so clear excess material and secure loose edges before crews start walking the roof with panels.
- Inspect before panel placement. Walk the full layout checking for tears, gaps at seams, exposed fasteners, and any spot where treated wood is still in direct contact with bare metal before the first panel goes down.
Pro Tip: Keep a spare roll of polymer slip sheet on the truck. A small tear discovered mid-install is a five-minute fix with the right material on hand, and a half-day delay without it.
Where to Source Slip Sheet Material and What to Specify
Most crews already have a go-to supplier, but a few sourcing channels cover nearly every job type.
- Plastics distributors: typically the best source for polyethylene and polymer sheet rolls in custom widths.
- Building-supply houses: carry rosin paper, standard underlayments, and ice-and-water shield in common roll sizes.
- Underlayment manufacturers: worth a direct call when a job needs a specific fire rating or UV exposure tolerance.
- Contractor supply houses: often stock both slip sheet rolls and the fasteners and accessories needed for the same job.
When placing an order, specify material type, roll width, thickness, and whether the job needs a fire-rated product or extended UV exposure tolerance before installation. For treated-lumber contact points, order self-adhering membrane specifically rather than a non-adhering polymer sheet, since the two serve different purposes on the same roof. Ask about lead times on custom cut-to-length rolls, since some distributors ship standard widths only, and request a sample swatch when a spec calls for a material you haven’t used before.
How Mid-Atlantic Metal Panels Supports Slip-Sheeted Installations
We supply the panel side of these jobs: custom-length 1-inch mechanical lock and 1.5-inch snap lock standing seam panels, cut-and-drop delivery, coordinated trim and flashing packages, and on-site roll forming for runs that don’t fit a standard truck. Ordering panels to the exact length needed means fewer field cuts near seams, which helps keep slip sheet layouts intact instead of getting disturbed by extra trimming. We also publish technical resources on our blog covering membrane-to-metal transitions and panel detailing for crews planning out separation layers before delivery day.
Moisture and UV Exposure: What They Do to a Slip Sheet Over Time
A slip sheet sits in a demanding spot: sandwiched between a metal panel and a deck, exposed to whatever moisture gets past flashing and to UV if the roof sits open during a staged install. Rosin and kraft paper absorb moisture readily, and once wet they lose tear strength and can wrinkle, which creates uneven high spots under the panel. That’s one more reason polymer sheets and synthetic underlayments have displaced paper products on most modern metal jobs: they shed moisture instead of holding it.
UV exposure matters mainly during the install window, before panels cover the sheet. Extended sun exposure can degrade some polymer formulations faster than others, which is why checking a product’s stated UV tolerance matters on jobs where a roof deck sits exposed for more than a few days. Self-adhering membranes used for treated-wood separation are generally formulated to handle longer exposure windows than basic polyethylene rolls, since they’re often installed well before final roofing.
Once the panel is in place, the slip sheet is largely protected from direct weather, but any gap at a seam, flashing point, or penetration can let moisture track in underneath it over the life of the roof. That’s part of why overlap direction and seam placement during install carry more long-term weight than they might seem to on install day. A sheet that holds up through installation but traps moisture against the deck afterward can cause more harm than one that was never installed at all.

Do Slip Sheets Work the Same Across Panel Gauges and Profiles
Slip sheet material doesn’t change dramatically by panel gauge, but movement characteristics do. A 24-gauge panel and a 26-gauge panel expand and contract at similar rates for the same alloy, since thermal movement is driven mainly by panel length and temperature swing rather than thickness. What changes more is how much clearance the panel’s clip system and seam profile allow for that movement, which affects how much the slip sheet actually gets worked against.
Standing seam profiles with mechanical lock seams, like the 1-inch profile many contractors specify for commercial runs, tend to hold tighter tolerances at the seam than snap lock profiles. That means the slip sheet underneath sees slightly different stress patterns depending on where clips sit and how the panel is fastened down the field. A slip sheet that performs fine under a snap lock panel with generous clip spacing isn’t automatically wrong for a mechanical lock panel, but it’s worth confirming the material’s tear resistance holds up under the specific clip layout and fastening pattern your panel manufacturer calls for.
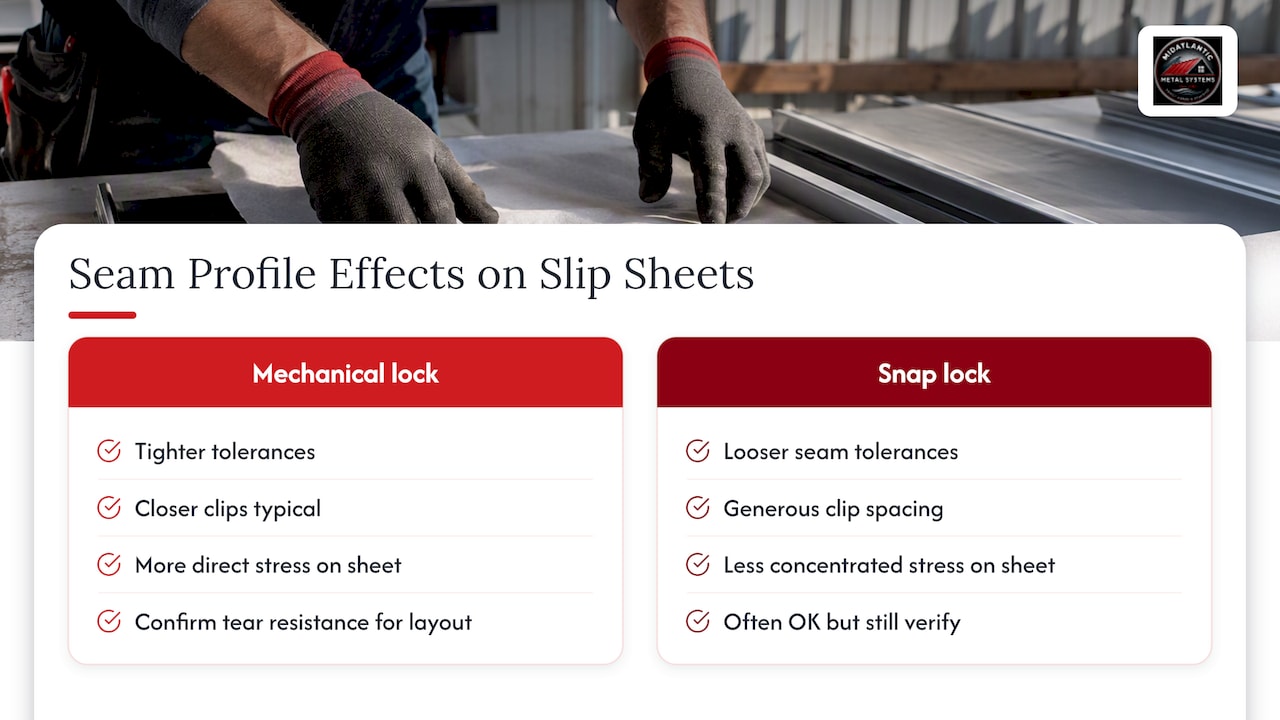
The practical rule: match the slip sheet’s durability to the panel’s expected movement and clip spacing, not just to the roof’s overall size. A short run of heavy-gauge panel may need less separation protection than a long run of lighter-gauge panel with more total thermal travel.
Checking a Slip Sheet After It’s Installed
Once panels go down, a slip sheet mostly disappears from view, which makes periodic inspection worth building into a maintenance routine rather than skipping it. During any roof-top service call for flashing repair, gutter work, or storm damage assessment, it’s worth pulling back a section of panel near a seam or penetration if access allows, checking for tears, moisture staining, or wrinkling in the layer underneath.
Signs that point to a problem include visible moisture staining on the underside of a panel, a musty smell near roof penetrations, or any soft spot in the decking near a treated-wood connection point. These usually mean the separation layer failed or was never installed correctly at that location, and catching it early is far cheaper than catching it after the deck itself has started to degrade.
For most roofs, a visual check during routine gutter cleaning or after a major storm is enough. There’s no fixed inspection interval that applies to every roof, since exposure and movement vary by region and roof design, but any time a panel is opened up for other repair work is a good moment to glance at the separation layer beneath it.
What Slip Sheets Actually Cost and Whether They’re Worth It
Slip sheet material itself is one of the cheaper line items on a metal roofing job. Polymer rolls, rosin paper, and standard underlayments all run well below the cost of the metal panels, fasteners, or trim they sit under, and labor to roll them out adds only a small amount of install time compared with panel placement itself.
Self-adhering ice-and-water shield costs more per square foot than plain polymer sheet, but it’s typically only needed at specific treated-wood contact points rather than across the entire deck, which keeps total material cost manageable even on larger jobs. The real cost comparison isn’t slip sheet material against no slip sheet material. It’s a small material cost up front against the cost of a corroded deck connection, a voided manufacturer warranty, or a callback to fix panel abrasion damage years down the line.
Manufacturer warranty terms sometimes specify required underlayment or separation layers as a condition of coverage, so it’s worth confirming warranty language with the panel manufacturer before deciding to skip a layer to save a small amount on material. Warranty terms and how they interact with installation choices are worth understanding before a crew decides a slip sheet is optional on a given job.
Contractor Perspective: Common Mistakes and Quick Fixes
The mistake I see most often is rosin paper still showing up on standing seam jobs out of habit, when a polymer sheet or self-adhering membrane handles the same spot better. The second is treated wood touching metal with nothing between them, usually because nobody double-checked that connection point before panels went down. Coordinate material choice with your panel supplier before ordering, not after the deck is already covered.
— Matt Catino
Get Panels, Trim, and Coordination Built for Slip-Sheeted Roofs
A slip sheet only works as well as the panel system it sits under, and that’s where coordinated ordering saves a crew real time. We fabricate custom-length standing seam panels cut to the exact run length a job needs, pair them with matching trim and flashing packages, and offer on-site roll forming when a run is too long for standard delivery.
Ordering panels, trim, and accessories from one source cuts down on mismatched details at seams, flashing, and penetration points, which are exactly the spots where separation layers matter most. Reach out through our cut-and-drop delivery service for a quote and jobsite coordination on your next metal roofing project.
FAQ
What do you call the wavy metal sheet?
Wavy or ribbed metal roofing is usually called corrugated metal panel, a different profile from the flat-seamed standing seam panels this article focuses on. Both profiles can require a slip sheet or separation layer depending on the substrate and deck material underneath.
What are the downsides of installing a metal roof over shingles?
Installing metal directly over old shingles can trap moisture against the roof deck and makes it harder to spot deck damage before it becomes a bigger problem. Most installers recommend a proper underlayment or slip sheet layer between the metal and the old roofing surface, and checking local code requirements before deciding whether a tear-off is required.
How long do galvanized roof sheets last?
Galvanized steel roofing panels can last for several decades with proper installation and maintenance, though actual lifespan depends on coating thickness, climate exposure, and how well separation layers protected the metal from corrosive contact with treated wood or other materials. Confirming manufacturer warranty terms gives a more specific expectation for a given panel product.
How do you avoid slipping off a metal roof during installation?
Wear roofing-specific footwear with soft rubber soles, use a roof harness and anchor points, and avoid walking on wet or dew-covered panels whenever possible. Clearing loose slip sheet material and fastener debris from the walking surface before crews move across the roof also reduces slip risk significantly.
Do all metal roofs need a slip sheet?
Not every metal roof requires a dedicated slip sheet, especially where a synthetic underlayment already provides adequate separation from the deck. A slip sheet or equivalent barrier becomes necessary on long panel runs with significant thermal movement and at any point where treated lumber contacts bare metal.
Sources
- What is a slip sheet? Complete guide for packaging & roofing
- Comparing asphalt felt and synthetic underlayments
- Excellence Bulletin — Treated wood on metal deck
- Slip sheets: Giving pallets the slip | Toyota Forklifts Blog